python

python cisco free test

Learn Python and Earn Free Badges with Cisco NetAcad

Are you ready to start your Python programming journey? I’ve found something exciting to share with you – two completely free Python courses from Cisco that will help you master Python fundamentals and earn valuable badges to showcase your skills! Why Learn Python? Python is one of the most popular and beginner-friendly programming languages in the world. Whether you want to build websites, analyze data, automate tasks, or dive into artificial intelligence, Python is your perfect starting point. The best part? You can learn it for free and get certified along the way! Free Python Courses with Badges Cisco Networking Academy offers two comprehensive Python courses that are completely free and provide you with official badges upon completion: 1. Python Essentials 1 Perfect for: Absolute beginners with no programming experience This course covers the fundamentals of Python programming and helps you build a strong foundation. You’ll learn: Get Started: Python Essentials 1 Course 2. Python Essentials 2 Perfect for: Those who’ve completed Python Essentials 1 or have basic Python knowledge This intermediate course takes your skills to the next level with: Get Started: Python Essentials 2 Course What You’ll Get 100% Free – No hidden costs or subscription fees Official Badges – Showcase your achievements on LinkedIn and your resume Self-Paced Learning – Study whenever and wherever you want Hands-On Practice – Real coding exercises and projects Industry Recognition – Cisco is a globally recognized technology leader How to Get Started Why I Recommend These Courses Unlike many other free resources that leave you wandering without direction, these Cisco courses provide structured learning paths with clear goals. The interactive exercises help you practice what you learn immediately, and the badges give you something tangible to show potential employers or clients. Whether you’re looking to switch careers, enhance your current job skills, or simply explore programming as a hobby, these courses are an excellent starting point. Ready to Start? Don’t wait! Your Python programming journey begins today. Click on the course links, enroll for free, and start earning those valuable badges. The skills you gain will open doors to countless opportunities in the tech world. Remember: Every expert programmer started exactly where you are now. Comment below if you get any other free resource, I will make a post

Learn Python and Earn Free Badges with Cisco NetAcad Read More »

Why Every Modern App Needs Composite APIs

Why Every Modern App Needs Composite APIs

Look, I’ll tell you the truth. When I first learned about “composite APIs,” I assumed it was just another catchphrase used by consultants to sound intelligent. However, I completely changed my mind after developing a few production apps and facing the nightmare of handling numerous API calls on the frontend. Let me tell you why composite APIs might just save your sanity (and your app’s performance). What Even Is a Composite API? Before we dive deep, let’s get on the same page. A composite API is basically an API endpoint that combines data from multiple sources or services into a single response. Instead of your frontend making 5 different API calls to get user profile, their posts, followers, notifications, and settings, you make ONE call to a composite endpoint that handles all that orchestration on the backend. Think of it like ordering a combo meal at a restaurant. You could order a burger, fries, and a drink separately, wait for each one, and pay three times. Or you could just order “Combo #3” and get everything at once. That’s essentially what composite APIs do for your app. The Problem They Actually Solve Here’s a real scenario I faced last year. We were building a dashboard for a SaaS app, and the homepage needed to show: Each of these lived in a different microservice. Our initial approach? Make 5 API calls from the React frontend. The result? A janky, slow-loading page with components popping in one by one like some weird progressive rendering experiment gone wrong. The problems with this approach: Let Me Show You: A FastAPI Example Okay, enough theory. Let’s build something real. Here’s a composite API endpoint using FastAPI that aggregates user dashboard data: What Makes This Powerful Notice a few things about this implementation: 1. Concurrent requests: We use asyncio.gather() to fire off all requests at the same time. Instead of waiting 200ms for each of 4 requests (800ms total), we wait for the slowest one, which might only be 250ms. 2. Graceful degradation: If the billing service is down, we don’t blow up the entire response. We return what we can and mark what’s missing. Your frontend can handle this elegantly. 3. Single round trip: The frontend makes ONE request and gets everything. This is massive for mobile users on flaky connections. 4. Business logic on the backend: The logic about how to combine, transform, and enrich this data lives on the server where it belongs, not scattered across your React components. Real-World Benefits I’ve Seen After implementing composite APIs in our app, we measured: When NOT to Use Composite APIs Look, composite APIs aren’t always the answer. Here’s when you should think twice: Don’t use them when: Be careful with: Some Practical Tips Here’s what I’ve learned building these in production: 1. Timeout strategically: Set aggressive timeouts. If a service takes more than 2 seconds, something’s wrong. 2. Add circuit breakers: If a downstream service keeps failing, stop calling it for a while. 3. Cache aggressively: Composite responses are perfect candidates for caching. Slap a Redis cache in front and watch your backend relax. 4. Monitor everything: Track which downstream services are slow or failing. You’ll thank yourself later. 5. Document what data is optional: Make it clear to frontend devs which fields might be null. The Bottom Line Composite APIs aren’t just a nice-to-have—they’re becoming essential for modern apps. As we move toward microservices and distributed systems, the frontend shouldn’t have to become an orchestration layer. That’s not its job. Your backend should expose clean, purpose-built endpoints that give the frontend exactly what it needs in one shot. Your users will notice the difference (faster loads, fewer errors), and your developers will thank you (simpler code, fewer bugs). Start small. Pick one page in your app that makes multiple API calls and create a composite endpoint for it. Measure the before and after. I bet you’ll be hooked. Have you implemented composite APIs in your projects? What patterns have worked for you? I’d love to hear about it in the comments below.

Why Every Modern App Needs Composite APIs Read More »

Real questions from my recent Python Developer interview

Python Interview Questions and Answers

Recently, I appeared for an interview, and I am sharing the questions and answers that were asked during the session. 1. Fibonacci Series in Python The Fibonacci series is a sequence in which each number is the sum of the two preceding numbers. Example (Loop Method): Example (List Generation): 2. List Comprehension vs Tuple Comprehension List Comprehension A concise way to create a list. ✔ Stores all values in memory. Tuple Comprehension (Generator Expression) Python does not have tuple comprehension. But you can write: This creates a generator, not a tuple.To convert to a tuple: 3. What is a Generator? A generator is a function or expression that returns values one at a time using the yield keyword. Example: Why Generators? 4. SQL Query to Find 2nd Highest Salary Method 1: Using ORDER BY + LIMIT (MySQL/PostgreSQL) Method 2: Using MAX() Function If the salary table is separate 5. How Python Manages Memory? Python uses multiple internal systems: Private Heap Memory All Python objects and data structures live in a private heap. Memory Manager Allocates space for objects automatically. Garbage Collector Uses: When no reference objects are deleted. Object Caching Mechanism Python caches: To improve performance. 6. How to Use Oracle Database with Python To connect Python with Oracle, use the cx_Oracle module. Install the library: Connection Example: Why cx_Oracle? 7. How do you handle if the Django Project suddenly gets high traffic? When Django receives sudden high traffic, I handle it by using caching to reduce server load, adding a load balancer to distribute requests, and scaling the application by running multiple instances. I also optimize database queries, move heavy tasks to background workers, use a CDN for static files, and monitor the system to detect issues early.

Python Interview Questions and Answers Read More »

Python object image

How to Check if an Object Has an Attribute in Python

I can’t tell you how many times I’ve run into this scenario: I’m working on a Python project, confidently accessing an object’s attribute, and boom—AttributeError crashes my program. Sound familiar? This happens all the time when you’re dealing with different object types. Maybe you’re working with user accounts where some users have premium features and others don’t. Or perhaps you’re building an API that receives varying data structures. Whatever the case, knowing how to safely check for attributes is essential. Let me walk you through the different ways I handle this in my own code. Why Bother Checking for Attributes? Here’s a real scenario I dealt with recently: I was building a user management system where regular users had basic info (name, email), but premium users had additional fields like subscription_type and discount_rate. If I tried to access user.subscription_type a regular user object, Python would throw an AttributeError and my whole application would crash. Not ideal, especially in production! That’s why we need to check first. The Different Ways to Check (And When I Use Each) 1. hasattr() – My Go-To Method Honestly, this is what I use 90% of the time. It’s clean, simple, and does exactly what you need: I love hasattr() because it’s readable. When someone else looks at my code, they immediately understand what I’m doing. 2. getattr() – Check and Grab in One Go Sometimes you don’t just want to check if an attribute exists—you want to use it right away. That’s where getattr() shines: I find this super useful when I’m setting up configuration objects or dealing with optional features. Instead of writing an if-statement, I just provide a sensible default. 3. Try-Except – When You Need More Control Sometimes I need to do something more complex when an attribute doesn’t exist. That’s when I reach for try-except: This approach is great when the attribute access itself might trigger some side effects, or when you want to log the missing attribute for debugging. 4. dir() – For When You’re Exploring To be honest, I mostly use dir() When I’m debugging or exploring an unfamiliar library: It’s not something I put in production code, but it’s invaluable during development. A Real Example from My E-commerce Project Let me show you how I used these techniques in an actual project. I was building a shopping cart system with different user tiers: The beauty here is that process_order() it doesn’t need to know what type of cart it’s dealing with. It just checks for the capability and acts accordingly. Works for Methods and Properties Too By the way, these techniques aren’t just for regular attributes. They work perfectly with methods and properties: What I’ve Learned Over Time After years of Python development, here are my rules of thumb: When to use what: Things to avoid: Here’s a mistake I made early on: Wrapping Up Learning to check for attributes properly has saved me countless hours of debugging and prevented so many crashes. The key takeaway? Choose the right tool for the job: Start with hasattr() For most cases, it’s Pythonic, readable, and gets the job done. You can always refactor to something more complex if you need to. What’s your preferred method? Have you run into any tricky situations with attribute checking? I’d love to hear about them in the comments!

How to Check if an Object Has an Attribute in Python Read More »

Building Real-World APIs with FastAPI

Building Real-World APIs with FastAPI

When I first started working with FastAPI, I was blown away by how quickly I could get a simple API up and running. But as my projects grew from proof-of-concepts to production systems serving thousands of requests per second, I learned that writing scalable FastAPI applications requires more than just decorating functions with @app.get(). Today, I want to share the patterns and practices I’ve developed over the past few years building APIs that actually scale in the real world. Why FastAPI? Before diving deeper, let me quickly justify why FastAPI has become my go-to framework. It’s not just hype—FastAPI genuinely delivers on its promises: But speed and features mean nothing if your codebase becomes unmaintainable at scale. The Layered Architecture Pattern The first mistake I made was putting everything in a single main.py file. It worked great for tutorials, but became a nightmare in production. Here’s the architecture I now use for every project: This structure separates concerns clearly: API endpoints handle HTTP, services contain business logic, and models represent data. It’s not over-engineering—it’s sustainable engineering. Dependency Injection: Your Best Friend FastAPI’s dependency injection system is powerful, but it took me a while to appreciate it fully. Here’s how I use it for database sessions: But dependencies aren’t just for databases. I use them for: The beauty is that dependencies are testable and composable. You can mock them easily in tests without touching your endpoint code. Configuration Management Done Right Hard-coded configuration is a recipe for disaster. I use Pydantic’s BaseSettings for environment-based config: This pattern gives you: Async All the Way (But Wisely) FastAPI supports async endpoints, but mixing sync and async code incorrectly can kill performance. Here’s what I learned: Use async when: Stick with sync when: Don’t make everything async just because you can. Profile and measure. Error Handling and Custom Exceptions Early on, I let exceptions bubble up and relied on default error messages. Bad idea. Now I use custom exception handlers: This gives you consistent error responses across your API and makes debugging much easier. Request Validation with Pydantic Pydantic schemas are more than just data containers—they’re your first line of defense against bad data: The validation happens automatically before your endpoint code runs. Invalid requests never reach your business logic. Background Tasks for Better Response Times Don’t make users wait for tasks that don’t need to be completed before responding: For heavier workloads, integrate with Celery or RQ, but background tasks are perfect for lightweight async operations. Testing Strategies That Work I use TestClient for integration tests and dependency overrides for mocking: The ability to override dependencies makes testing incredibly clean—no monkey patching required. Database Session Management One of the trickiest aspects is managing database sessions correctly. Here’s my pattern: Never create global database sessions. Always use dependency injection and let FastAPI handle the lifecycle. Monitoring and Observability You can’t improve what you don’t measure. I add middleware for request logging and timing: For production, integrate with proper monitoring tools like Prometheus, DataDog, or New Relic. Rate Limiting for Protection Protect your API from abuse with rate limiting. I use slowapi: Caching for Performance For expensive operations or frequently accessed data, implement caching: For distributed caching, Redis is your friend. Use libraries like aioredis for async support. Final Thoughts Building production-grade APIs with FastAPI isn’t about following every pattern blindly—it’s about understanding which patterns solve real problems in your specific context. Start simple, profile your application, identify bottlenecks, and apply these patterns where they make sense. Over-engineering early is just as bad as under-engineering. The patterns I’ve shared here have saved me countless hours of debugging and refactoring. They’ve helped me build APIs that handle millions of requests per day with confidence. FastAPI gives you the tools, but it’s up to you to use them wisely. Happy coding!

Building Real-World APIs with FastAPI Read More »

python 3.14

Python 3.14 Is Here: The Most Exciting Update Yet!

Python 3.14 came out on October 7, 2025, and it has a lot of useful and powerful features that make coding easier, faster, and more fun.This version has something for everyone, whether you’re a beginner, a data scientist, or a backend developer. Let’s dive into what’s new and why it matters 1. Template Strings (t-Strings) You’ve seen f-strings (f”Hello {name}”) for formatting text, right?Now meet t-strings — written as t”…”. Instead of directly turning into a string, a t-string keeps the template information.This means you can safely inspect or reuse the placeholders before final formatting. Why it’s cool: Think of it like f-strings with superpowers. 2. Lazy Type Hints (No More Import Errors) If you’ve ever faced annoying “circular import” issues when using typing, rejoice!Python 3.14 now delays evaluation of type hints — they’re stored as expressions, not immediately executed. That means: Why it’s great:Cleaner code, fewer import headaches, and faster app startup. 3. Free-Threaded Python (No More GIL) This is huge. The Global Interpreter Lock (GIL) — Python’s long-time concurrency bottleneck — is now optional.Python 3.14 introduces an official free-threaded build, allowing true multi-threading. That means your threads can finally run in parallel on multiple CPU cores. Why it matters: Tip: If you use C extensions or NumPy, test compatibility before switching builds. 4. A Smarter, Colorful REPL Say hello to a more modern interactive shell! Python 3.14’s built-in REPL (the prompt you get by typing python in your terminal) now has: Example: Why you’ll love it:No need for extra tools like IPython to enjoy a colorful, beginner-friendly shell. 5. Cleaner Error Messages Errors in Python keep getting more human-friendly. Now, Python can suggest corrections when you mistype keywords or module names.It also shows clearer hints when exceptions happen in tricky spots. Example: No more head-scratching moments over simple typos. 6. New Syntax Options Python gets some subtle syntax polish this time: Shorter exception handling You can now write multiple exceptions without parentheses: Warnings for risky finally: blocks If you use return, break, or continue inside a finally: clause, Python 3.14 warns you — since it can silently skip cleanup code. 7. Standard Library Upgrades Lots of small but awesome library updates: Example: Why it’s useful:You get smarter CLI tools, better file management, and more modern compression built right in. 8. Performance Boosts Under the Hood You may not notice dramatic speed jumps, but overall Python feels snappier — especially for import-heavy apps. 9. Developer Quality-of-Life Tweaks Final Thoughts Python 3.14 feels like a developer-focused release — combining practical improvements with exciting groundwork for the future. Top highlights: If you haven’t upgraded yet, now’s the time.Run: Comment below if you like this post

Python 3.14 Is Here: The Most Exciting Update Yet! Read More »

python os module

Master Python OS Module: Simple Guide to Powerful System Control

Hey there! So you want to work with files and folders in Python? Maybe automate some boring stuff? Well, the OS module is going to be your new best friend. Trust me, once you get the hang of it, you’ll wonder how you ever lived without it. What’s This OS Module Anyway? Think of the OS module as Python’s way of talking to your computer. Want to create a folder? Move files around? Check if something exists? The OS module has got your back. And the best part? It works the same whether you’re on Windows, Mac, or Linux. Write once, run anywhere! That’s it. One line and you’re ready to go. Let’s Start Simple – Working with Folders Where am I right now? Ever get lost in your terminal? Yeah, me too. Here’s how to check where you are: Moving around Making new folders That second one is super handy. It creates all the folders in the path if they don’t exist yet. What’s in this folder? Simple, right? This shows everything in your current directory. Dealing with Files and Paths Does this thing even exist? Before you try to open or delete something, you probably want to make sure it’s actually there: Is it a file or a folder? Joining paths the smart way Here’s a rookie mistake I used to make – hardcoding paths with slashes: Breaking paths apart Moving and Deleting Stuff Renaming files Getting rid of things Environment Variables – Super Useful! Your computer has these things called environment variables. They’re like settings that programs can read: Some Real-World Examples Example 1: Walking through all your files This is one of my favorites. It lets you go through every file in a directory and all its subdirectories: Example 2: Organizing a messy downloads folder We’ve all been there – a downloads folder full of random files. Let’s organize them by file type: Example 3: Getting file info Quick Tips I Wish Someone Told Me Earlier 1. Always use os.path.join() Seriously. Even if you’re only working on one operating system right now, your future self (or your teammates) will thank you. 2. Check before you wreck Always verify a file or folder exists before trying to do something with it. Trust me, you’ll save yourself a lot of headaches: 3. Use try-except blocks Things can go wrong. Permissions issues, files in use, you name it: 4. Consider pathlib for newer projects If you’re using Python 3.4 or newer, check out the pathlib module. It’s more modern and object-oriented. But the OS module is still super useful, and you’ll see it everywhere in older code. Wrapping Up Look, the OS module might seem a bit overwhelming at first, but once you start using it, you’ll realize how powerful it really is. Start small maybe just list some files or check if something exists. Then gradually build up to more complex tasks. I’ve included some of the basic features of the OS module here. It has many extensive capabilities that I can’t cover in a single post, but in general, you can use it to interact deeply with your system. If you guys explore more, please share it with me. You can even create an OS controller using Python modules.

Master Python OS Module: Simple Guide to Powerful System Control Read More »

python dictionaries

Unlocking Python Dictionaries: A Beginner’s Guide to Adding New Keys

Think of a dictionary as a real-life address book. You don’t flip through every page to find someone; you look up their name (key) to instantly get their address (value). Dictionaries work the same way, storing data in key: value pairs for lightning-fast retrieval. But what happens when you get a new friend and need to add them to your address book? You just added a new entry! Similarly, in Python, you often need to add new keys to a dictionary. This blog post will guide you through the different ways to do just that, making you a dictionary master in no time. Method 1: The Straightforward Way – Using Square Brackets [] This is the most common and intuitive method. The syntax is simple: my_dictionary[new_key] = new_value If the new_key doesn’t exist, Python happily adds it to the dictionary. If it does exist, Python updates its value. It’s a two-in-one operation! Example: See? It’s as easy as assigning a value to a variable. Method 2: The Safe Bet – Using the .get() Method Sometimes, you’re not sure if a key exists. You might want to add a key only if it’s not already present. Using [] directly would overwrite the existing value, which might not be what you want. This is where the .get() method shines. While .get() it is primarily used for safe retrieval, we can use the logic it provides to conditionally add a key. Example: This method prevents accidental data loss. Method 3: The Powerful Update – Using the .update() Method What if you need to add multiple keys at once? The .update() method is your best friend. It can merge another dictionary or an iterable of key-value pairs into your original dictionary. Example 1: Merging Two Dictionaries Example 2: Using an Iterable Just like the [] method, if any of the new keys already exist, .update() will overwrite their values. Method 4: The Modern Approach – Using the “Walrus Operator” := (Python 3.8+) This is a more advanced technique, but it’s elegant for specific scenarios. The Walrus Operator := allows you to assign a value to a variable as part of an expression. It’s useful when you want to check a condition based on the new value you’re about to add. Example: Note: This is a more niche use case, but it’s good to know it exists! A Real-World Example: Building a Shopping Cart Let’s tie it all together with a practical example. Imagine you’re building a simple shopping cart for an e-commerce site. Output: This example shows how you can use all three primary methods in a cohesive, real-world scenario. Summary: Which Method Should You Use? Now you’re equipped to dynamically build and modify dictionaries in your Python projects. Go forth and code! Remember, the key to mastering dictionaries is practice.

Unlocking Python Dictionaries: A Beginner’s Guide to Adding New Keys Read More »

django sped up image

How I made my Django project almost as fast as FastAPI

FastAPI runs on Uvicorn, an ASGI server made for Python code that runs at the same time. Django is older and has more features, but from version 3.0, it can also operate on ASGI with Uvicorn. Once you set up Django on Uvicorn and make queries and caching work better, you can get the same speed for most things. 1. Start Django with Uvicorn The best way to improve performance is to switch to an ASGI server. Install Uvicorn Make sure your project has a asgi.py file, which is made automatically in Django 3+. Then turn on the server: uvicorn myproject.asgi:application –host 0.0.0.0 –port 8000 –workers 4 Why Uvicorn If you use a process manager like Supervisor or systemd, you can add: 2. Use async views where possible Why use httpx instead of requests: It lets you send HTTP requests (GET, POST, etc.) and handle responses, similar to requests, but it also supports asynchronous programming (async/await). That means you can make many API calls at once without blocking your Django or FastAPI app, ideal for performance and concurrency. import httpx from django.http import JsonResponse async def price_view(request): async with httpx.AsyncClient() as client: r = await client.get(‘https://api.example.com/price’) return JsonResponse(r.json()) For ORM queries, still use sync code or wrap it with sync_to_async: from asgiref.sync import sync_to_async from django.contrib.auth.models import User @sync_to_async def get_user(pk): return User.objects.get(pk=pk) async def user_view(request): user = await get_user(1) return JsonResponse({‘username’: user.username}) 3. Optimize your database Example: posts = Post.objects.select_related(‘author’).all() 4. Enable caching with Redis Install Redis and configure Django: pip install django-redis Add this to settings.py: CACHES = { ‘default’: { ‘BACKEND’: ‘django_redis.cache.RedisCache’, ‘LOCATION’: ‘redis://127.0.0.1:6379/1’, ‘OPTIONS’: { ‘CLIENT_CLASS’: ‘django_redis.client.DefaultClient’, } } } Cache heavy views: from django.views.decorators.cache import cache_page @cache_page(60) def home(request): return render(request, ‘home.html’) 5. Offload background work Use Celery or Dramatiq to handle slow tasks like emails or large file uploads asynchronously. 6. Serve static files efficiently Use WhiteNoise for small deployments or a CDN (Cloudflare, S3 + CloudFront) for large ones. MIDDLEWARE = [ ‘django.middleware.security.SecurityMiddleware’, ‘whitenoise.middleware.WhiteNoiseMiddleware’, # … ] 7. Monitor performance Example Benchmark Running the same Django app under Uvicorn vs Gunicorn (WSGI): Server Avg Latency Req/s Gunicorn (WSGI) 90 ms 700 Uvicorn (ASGI) 40 ms 1400 Final Thoughts FastAPI may always win in pure async benchmarks, but Django + Uvicorn can be nearly as fast for most production workloads — and you keep Django’s ORM, admin, and ecosystem. Checklist:

How I made my Django project almost as fast as FastAPI Read More »

Flatten a List of Lists in Python

How to Flatten a List of Lists in Python

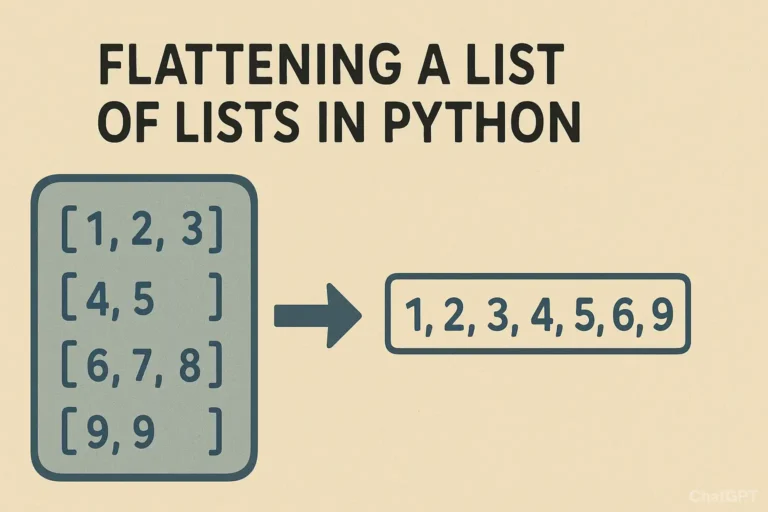
You open one list, only to find another list inside, and then another. In programming, we call this a “list of lists.” While this is a powerful way to organize data, there are countless times when you just need a simple, single-level list to work with. The process of converting this nested structure into a single list is called “flattening.” Imagine you’re cleaning up a cluttered desk. You have several piles of papers (the lists of lists), and you need to put all the papers into a single, neat stack (the flat list) to feed through a scanner. That’s exactly what flattening a list does! Example of a List of Lists: list_of_lists = [[1, 2, 3], [4, 5], [6, 7, 8, 9]] Our goal is to turn this into: flat_list = [1, 2, 3, 4, 5, 6, 7, 8, 9] Let’s explore the most effective ways to achieve this in Python, from the classic methods to the modern, elegant one-liners. Method 1: The Classic For-Loop This method is perfect for understanding what’s happening under the hood. We use a nested loop: one loop to go through each sub-list, and an inner loop to go through each item inside those sub-lists. # Our nested data list_of_lists = [[‘Alice’, ‘Bob’], [‘Charlie’, ‘Diana’], [‘Eve’]] # Start with an empty list to hold our results flat_list = [] # Outer loop: iterate through each sub-list (e.g., [‘Alice’, ‘Bob’]) for sublist in list_of_lists:     # Inner loop: iterate through each item in the current sub-list     for item in sublist:         # Append the item to our final flat_list         flat_list.append(item) print(flat_list) # Output: [‘Alice’, ‘Bob’, ‘Charlie’, ‘Diana’, ‘Eve’] Why use this method? Method 2: The itertools.chain() The itertools.chain() function efficiently treats a series of lists as one continuous sequence, making it very fast. import itertools list_of_lists = [[10, 20], [30], [40, 50, 60]] # The asterisk (*) unpacks the list_of_lists into separate arguments flat_list = list(itertools.chain(*list_of_lists)) print(flat_list) # Output: [10, 20, 30, 40, 50, 60] Why use this method? Method 3: List Comprehension Developers love list comprehensions. They create lists in a single, expressive line, and many consider them the most ‘Pythonic’ way to flatten a list. list_of_lists = [[‘Red’, ‘Blue’], [‘Green’], [‘Yellow’, ‘Purple’, ‘Orange’]] # Read it as: “For each sublist in list_of_lists, give me each item in that sublist.” flat_list = [item for sublist in list_of_lists for item in sublist] print(flat_list) # Output: [‘Red’, ‘Blue’, ‘Green’, ‘Yellow’, ‘Purple’, ‘Orange’] Why use this method? A Real-World Example: Consolidating Weekly Tasks Let’s say you’re building a simple to-do list application. Your data for the week might be stored as a list of daily task lists. weekly_tasks = [     [‘Email client’, ‘Write report’],        # Monday     [‘Team meeting’, ‘Buy groceries’],       # Tuesday     [‘Gym’, ‘Read book’],                    # Wednesday ] # You want a single list of all tasks for the week to calculate the total number. all_tasks = [task for day in weekly_tasks for task in day] print(f”Total tasks this week: {len(all_tasks)}”) print(“All tasks:”, all_tasks) # Output: # Total tasks this week: 6 # All tasks: [‘Email client’, ‘Write report’, ‘Team meeting’, ‘Buy groceries’, ‘Gym’, ‘Read book’] This flat list is now much easier to work with if you want to search for a specific task, count all tasks, or assign priorities across the entire week. Deeply nested lists — recursive flattening If your nesting depth is unknown (e.g., lists inside lists inside lists…), use a recursive approach. Be careful to treat strings as atomic (so they don’t get iterated character-by-character). from collections.abc import Iterable def flatten_deep(seq): for item in seq: if isinstance(item, Iterable) and not isinstance(item, (str, bytes)): yield from flatten_deep(item) else: yield item deeply_nested = [[[1, 2], [3, 4]], [[5, 6]], 7, [‘eight’, [‘nine’]]] print(list(flatten_deep(deeply_nested))) # [1, 2, 3, 4, 5, 6, 7, ‘eight’, ‘nine’] Note: This handles arbitrary depths. If you only need to flatten one level, prefer the simpler methods above. Summary: Which Method Should You Choose? Method Pros Cons Best Use Case For-loop – Very clear and beginner-friendly– Easy to add custom logic (filters, transformations) – Verbose– More lines of code When you need readability or conditional flattening List comprehension – Concise & expressive– Considered the most “Pythonic”– Readable for experienced developers – Harder to read with complex conditions– Can get messy in long one-liners Everyday use for simple flattening itertools.chain.from_iterable() – Very fast– Memory-efficient (iterator-based)– Scales well to large datasets – Requires import– Less obvious for beginners Large datasets or performance-critical tasks Recursive function (deep flatten) – Handles arbitrarily nested lists– Flexible (can adapt to skip/transform items) – More complex to implement– Slightly slower than shallow methods– Recursion depth limit in Python For most situations, the list comprehension is the recommended choice. It’s a perfect but when it comes to multiple conditions, then use append because the code will become messy, you can’t figure it out later. So next time you find yourself with a nested list, don’t unpack it manually, let Python do the heavy lifting and flatten it with ease Comment below if you like or have any queries

How to Flatten a List of Lists in Python Read More »

Scroll to Top